To create a KPI, follow the steps below.
STEP 1: Go to Planning > Performance Measurement > KPIs
STEP 2: Click on the ‘New’ icon at the top of the KPI list on top right hand side of the screen, or you can use the dedicated icon in quick access side bar menu ![]()
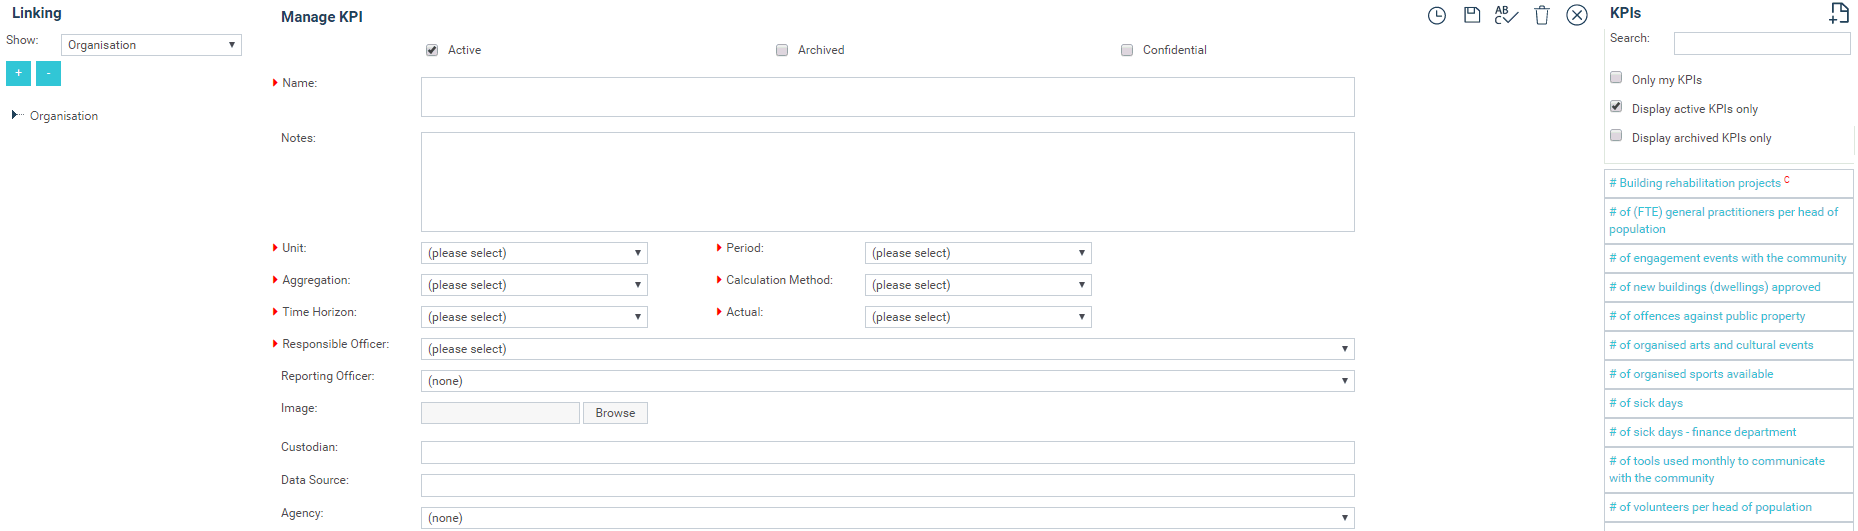
STEP 3: Use the tick boxes on the top of the page for filtrations, if the KPI KPI is defined as 'ACTIVE', 'ARCHIVED' and 'CONFIDENTIAL.'
|
Active |
For the KPI to be active, the Active tick box must be selected. If not, this KPI will not appear in standard reports and in EIS area. |
|
Archived |
Use the Archive tick box to help you identify if the KPI is no longer in use. Archived KPIs also do not appear in reports or in EIS area. |
|
Confidential |
The Confidential tick box will only be displayed if this functionality is activated by your System Administrator. Selecting will mean that this KPI only be visible to its Reporting Officer, Responsible Officer, System Administrator or users assigned with the security role “Confidential”. |
STEP 4: Enter a name for your KPI; ensure that this name accurately describes what is being measured. Note that the field length in the KPI name field is limited so you may need to abbreviate some words. Include any additional information such as what the KPI means and how your organisation calculates it, in the Notes section.
STEP 5: Enter a unit of measurement by clicking on the drop down list ‘Unit’ and select the most suitable option.
Examples include number, percentage, days, and currency. This is the ‘Y’ axis of the KPI graph.
STEP 6: Select a period which indicates how often you want to measure this indicator.
For example is it Monthly, Quarterly or Annually? It is important that this is chosen correctly in the first instance as it cannot be modified once created.
STEP 7: Choose your aggregation method from the available options: cumulative, normal and average.
Cumulative will result in the system summing up values based on the time frames selected.
Normal will return the figure for the last closing reporting period within the selected time frame.
Average will display data as an average of the period of analysis.
IMPORTANT: If you have changed the KPI aggregation at any time after setting it up, you will need to re-save the targets and actuals tab (re-save the current data) in order for the calculations to be refreshed and reflect correctly within other screens/reports, etc.
STEP 8: Select the 'Calculation Method' for the KPI which determines the rules behind the traffic light reporting. You can choose Less is Better, More is Better or Goal Post.
STEP 9: Click on the 'Time Horizon' dropdown in order to choose how the KPI graphs and values are displayed.
This is an optional field which can be activated by CAMMS if requested as part of your Scoping Day. There are three options: YTD, Period and Rolling. If not activated, the Time Horizon will default to Period.
STEP 10: Click on the 'Actual' dropdown box to choose what value should be displayed within the system with regards to the KPI's actual.
There are three options: Actual number, Actual Variance percentage or Actual variance number.
Actual # is the usual actual that is used within the system. It shows the actual that you have entered or the actual which has been calculated (for calculated KPIs) or the actual which has been imported via integration.
Actual Variance # will display KPI graphs, and in EIS, the variance of the actual entered to the target entered as an absolute number. Calculated as Actual minus Target (taking into consideration the aggregation method of the KPI)
Actual Variance % will display in KPI graphs and in EIS the variance of the actual entered to the target entered as a percentage. Calculated as ((Actual - Target)/ Target) *100 (taking into consideration the aggregation method of the KPI).
|
|
This is an optional field which can be activated by CAMMS if requested as part of your Scoping Day. If not activated, the KPI Actual will default to the setting for Actual number which is the most commonly used type in the system. |
The below shows an example for a cumulative KPI:
|
Period |
Target |
Actual |
Cumulative Target YTD |
Cumulative Actual YTD |
Cumulative Variance YTD |
Cumulative Variance % YTD |
|
1 |
998700 |
933340.74 |
998700.00 |
933340.74 |
-65359.26 |
-6.54 |
|
2 |
1636300 |
1813289.05 |
2635000.00 |
2746629.79 |
111629.79 |
4.24 |
|
3 |
1410281 |
1293574 |
4045281.00 |
4040203.79 |
-5077.21 |
-0.13 |
|
4 |
1707735 |
1747895.36 |
5753016.00 |
5788099.15 |
35083.15 |
0.61 |
STEP 11: Select a responsible officer from the dropdown list provided.
You can also select a Reporting Officer who will have access to update the actual values of the KPI such as a Personal Assistant.
STEP 12: Add a relevant image against the KPI.
STEP 13: Custodian and Data source fields can be used to record the bodies which own the data or where the data has come from, respectively.
STEP 14: You can link a KPI to an Agency as per the list of Agencies established by your administrator.
STEP 15: Choose the KPI category between Efficiency, Effectiveness and Workload.
STEP 16: Choose between a time frame of Lead or Lag that best suits your KPI.
|
|
|
STEP 17: Select one of three Input Types:
Input: indicators of whatever the organisation uses to produce outputs
Outcome: indicators of the results achieved from the services provided
Output: indicators of service, quality, timeliness and cost in management and delivery of services
STEP 18: Select a KPI Type. Selection must be made very carefully as it cannot be changed after the record has been saved. The options are Normal, Trend or Calculated. The latter option is an optional feature which can be activated by CAMMS if requested as part of your Scoping Day. Similarly, make a selection between Single or Rollup from the choices below. For more information on how each of these selections determine your KPI's functionality and graphing mechanisms refer the relevant topics below:
This topic assumes that you are creating a Normal, Single KPI.
STEP 19: Tick the “Show Forecast” and “Show Benchmark” tick boxes to allow you to enter and display additional KPI data. When enabled from this page, you will be able to enter values for them within the Targets/Actuals tab and standard KPI graphs will plot their values as additional lines. You can tick the "Show Additional Benchmark Fields" if you wish to include additional benchmark fields.
STEP 20: Click SAVE to commit the entry or CLOSE to exit without saving.
STEP 21: Once a KPI is created, navigate to the Target/Actual tab and click save. This step is mandatory, until you Save the Target/Actual tab the relevant KPI will not reflect in any KPI Related reports.
|
|
If you have saved the KPI, and selected the wrong KPI type (single or rollup), you will need to delete the record and start the process again. Deletion will only be possible if the KPI has not already been linked, and will be dependent upon security settings. |
Copyright © 2014-2015 CAMMS Online Help. All rights reserved.
Last revised: November 26, 2017
